
The Iptanus File Upload plugin lets visitors to a WordPress site upload files from a page or post, and carries more than fifty options for controlling how that works.
How the form is put together
The form is modular: the title, the filename, the select button, the upload button, the progress bar, the captcha and the rest are separate boxes, which the placements attribute arranges beside, above or below one another. Here is an example being built in the plugin’s Shortcode Composer:
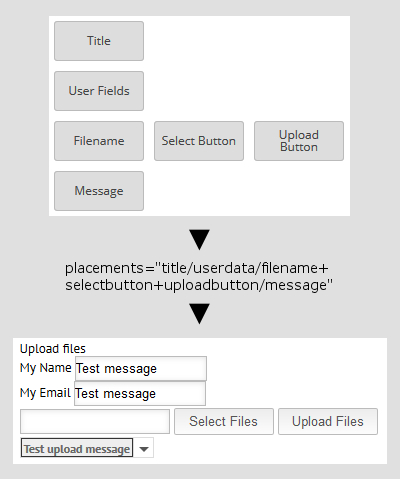
Each element carries deliberately minimal styling of its own, so that it takes on the rules of your theme. The form above was built on a site running Avada. The same form under Bouquet looks like this:

Bouquet has put borders and bottom margins on the plugin’s elements, and the result is a mess. The way to fix it is CSS, and the plugin is built to make that straightforward: every element has its own class, and most have an id as well, so you can select them singly or in groups.
Where to put the CSS
There are three practical places for it:
- In the theme’s own custom CSS area, under Appearance → Customise → Additional CSS. Every page carrying the plugin is affected.
- In the page itself, wrapped in <style></style> tags. Only that page is affected.
- In the shortcode, through the css attribute. This one is for the Professional version only, and the Shortcode Composer will write the attribute for you.
Styling the form for Bouquet
Your browser’s developer tools are worth having open while you work — they let you try rules against the live form and see the result at once. After some experimenting, this is a set of rules that works well:
table.file_table_clean, table.file_messageblock_table {
  margin: 0;
  border: none;
}
tr td.file_td_clean, table.file_messageblock_table tr td {
  padding: 0;
  border: none;
}
span.file_title_clean {
  font: initial;
  font-size: 20px;
  margin-bottom: 4px;
  display: inline-block;
  text-shadow: 1px 1px 0px #fff;
  color: #333
}
label.file_userdata_label {
  display: inline-block;
  color: #333;
}
input.file_userdata_message[type="text"], input.file_input_textbox[type="text"] {
  background: none repeat scroll 0% 0% #FAFAFA;
  box-shadow: 0px 1px 1px rgba(0, 0, 0, 0.1) inset;
  border: 1px solid #E7D9B9;
  border-radius: 3px;
  color: #891E42;
  padding: 0.3em;
}
div.file_div_clean input[type="button"], div.file_div_clean input.file_input_submit[type="button"] {
  background-image: none;
  background-color: rgb(177, 69, 98);
  color: rgb(255, 244, 249);
  border: medium none;
  border-radius: 2px;
}
div.file_div_clean input.file_input_button_hover[type="button"], div.file_div_clean input.file_input_submit[type="button"]:hover, div.file_div_clean input.file_input_submit[type="button"]:focus {
  background-color: #90364E;
}
div.file_messageblock_header {
  background-color: rgb(255, 235, 242);
  border: 1px solid rgb(177, 69, 98);
  color: rgb(137, 30, 66);
}
table.file_messageblock_table div {
  padding: 8px;
}
td.file_messageblock_arrow_td div, td.file_messageblock_filearrow_td div {
  padding: 0;
}
div.file_messageblock_header, div.file_messageblock_fileheader {
  background-color: #FFD8E8 !important;
  border: medium none !important;
  color: rgb(137, 30, 66) !important;
}
The above css rules, combined with some modifications to the plugin’s shortcode:
[wordpress_file_upload placements="title/userdata/filename+selectbutton+uploadbutton/message" testmode="true" userdata="true" userdatalabel="My Name/My Email" widths="filename:170px, selectbutton:90px, uploadbutton:90px, userdata_label:100px, userdata_value:255px, message:368px" heights="selectbutton:34px, uploadbutton:34px"]
have the following result:

That is a considerable improvement on the second screenshot. Here is how to install those rules, by each of the three routes.
1. The theme’s custom CSS area
Copy the rules, open Appearance → Customise → Additional CSS in the Dashboard, and paste them in.
2. Inside the page
Paste the rules at the top of the page holding the shortcode, wrapped in <style></style> tags.
3. Inside the shortcode
This route is for the Professional version. The rules have to be rewritten in the form the plugin reads, which the Shortcode Composer does for you. The result looks like this:
css="table.file_table_clean, table.file_messageblock_table {%n% margin: 0;%n% border: none;%n%}%n%tr td.file_td_clean, table.file_messageblock_table tr td {%n% padding: 0;%n% border: none;%n%}%n%span.file_title_clean {%n% font: initial;%n% font-size: 20px;%n% margin-bottom: 4px;%n% display: inline-block;%n% text-shadow: 1px 1px 0px #fff;%n% color: #333%n%}%n%label.file_userdata_label {%n% display: inline-block;%n% color: #333;%n%}%n%input.file_userdata_message%brl%type=%dq%text%dq%%brr%, input.file_input_textbox%brl%type=%dq%text%dq%%brr% {%n% background: none repeat scroll 0% 0% #FAFAFA;%n% box-shadow: 0px 1px 1px rgba(0, 0, 0, 0.1) inset;%n% border: 1px solid #E7D9B9;%n% border-radius: 3px;%n% color: #891E42;%n% padding: 0.3em;%n%}%n%div.file_div_clean input%brl%type=%dq%button%dq%%brr%, div.file_div_clean input.file_input_submit%brl%type=%dq%button%dq%%brr% {%n% background-image: none;%n% background-color: rgb(177, 69, 98);%n% color: rgb(255, 244, 249);%n% border: medium none;%n% border-radius: 2px;%n%}%n%div.file_div_clean input.file_input_button_hover%brl%type=%dq%button%dq%%brr%, div.file_div_clean input.file_input_submit%brl%type=%dq%button%dq%%brr%:hover, div.file_div_clean input.file_input_submit%brl%type=%dq%button%dq%%brr%:focus {%n% background-color: #90364E;%n%}%n%div.file_messageblock_header {%n% background-color: rgb(255, 235, 242);%n% border: 1px solid rgb(177, 69, 98);%n% color: rgb(137, 30, 66);%n%}%n%table.file_messageblock_table div {%n% padding: 8px;%n%}%n%td.file_messageblock_arrow_td div, td.file_messageblock_filearrow_td div {%n% padding: 0;%n%}%n%div.file_messageblock_header, div.file_messageblock_fileheader {%n% background-color: #FFD8E8 !important;%n% border: medium none !important;%n% color: rgb(137, 30, 66) !important;%n%}"
If you have questions or would like a hand with the CSS, please contact us.
The Iptanus team
Great tool! Everything works fine apart from:
Placement changing doesn´t work.
Changing of dimension values are without effect.
Some ideas?
Thanks, Joe
How can I change the TEXTS of the buttons BEFORE they are put into htm?
I basically need something to be put in functions.php
Hi, you can change the buttons texts from the shortcode using the visual editor. Open the visual editor nd go to Labels tab. There you will find options for the button texts.
Regards
Nickolas
I copy and paste CSS code into my theme’s Style.css but didn’t work. Any idea?